


White Pinnacle Peak
I’m proud to say that I successfully climbed White Pinnacle Peak last Saturday. This is a challenging class 4 climb in Red Rock, which is a conservation area west of Las Vegas. In case you’re not familiar with the classes of hiking/climbing, here is how I would put it:
Class 1 – Easy hiking, usually on a trial.
Class 2 – Easy scrambling. Hands needed, but nothing difficult or dangerous.
Class 3 – More challenging scrambling. Hands will be required. Minor injuries may result in a fall.
Class 4 – Challenging and exposed. Serious injury or death may be the result of a fall. Ropes sometimes used for protection.
Class 5 – Ropes, harness, and a belayer almost certainly will be used for safety. This class is subdivided into subclasses, depending on the level of difficulty.
For more on that topic, I suggest the article Climbing Rating Systems at Mountain Madnes.
Here are some statistics on White Pinnacle, from Hiking Las Vegas, of which I am a proud member.
Class: 4
Distance: 5.0 miles (round trip)
Summit coordinates: 36.0835450, -115.4792760
Exposure: 10 out of 10
Difficulty: 10 out of 10
Danger: 10 out of 10
Elevation gain: 1,900 feet
Notes: Extremely exposed peak on the SE side of Mt. Wilson, accessible from First Creek. Steep technical climbs and/or traverses, 3 rope sections.
Source: White Pinnacle Peak Hike Details
With the introduction out of the way, let me get to my personal climb. I did it with three friends – Patti, Nate, and Brett. Patti and Brett had done it before. Although this peak earns the King of Diamonds card in the 52 Peak Club, we didn’t do it as a club hike, so no card for me.
They say a picture is worth 1,000 words, so I think I’ll mostly rely on them to tell the story.
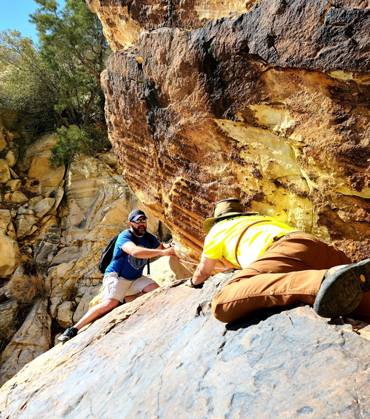
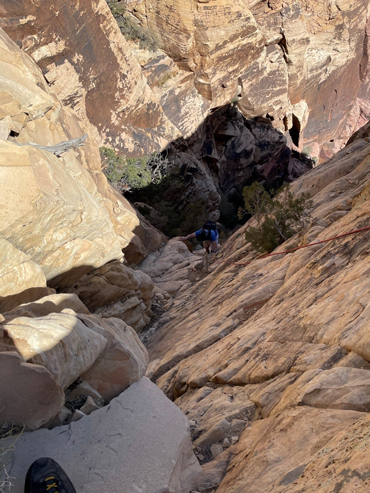
That is me in the yellow shirt at the first tricky spot. The picture doesn’t show it, but that rock I’m on is big and slippery. If it were not for that rope around my waste, then one wrong move and I would be leaving in a helicopter. That is Nate in the blue shirt holding the other end of the rope. While we used ropes for safety in several spots, they were never actually needed. In other spots, preset ropes were definitely need.
My technique in this section was to shove at least one hand, at all times, in the crack between the two rocks.
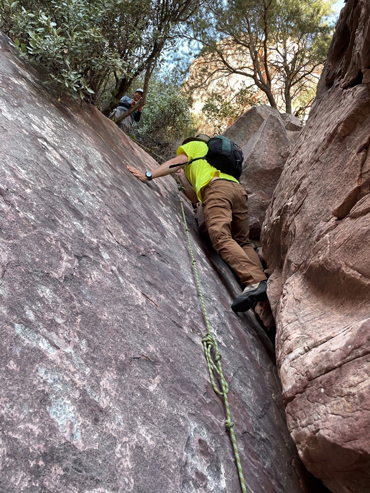
This picture shows the first place where a rope was conveniently already in place. That rock it is on is nearly vertical. There are two ways I can think to climb this section:
- Hold onto the rope and walk up the rock. The more horizontal your body, the more effort is taken off your arms and transferred to your legs. This is also true of rappelling.
- Inch your way up the gap between the two rocks, which does not require reliance on the rope.
I chose option 2, which, in retrospect, was probably more difficult and dangerous. Nate went with option 1 and gracefully and quickly walked up the rock. I’ll do it that way next time.

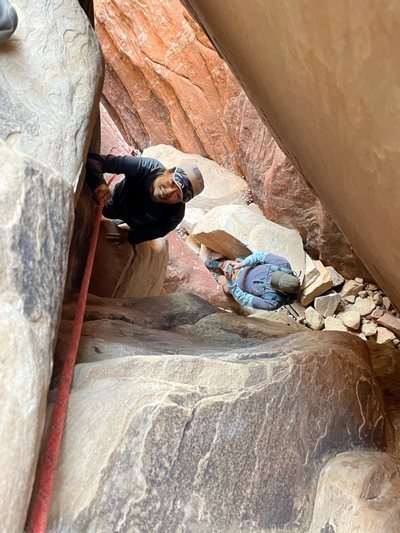
This next section is called the Rabbit Hole and also conveniently had a rope kindly left by previous climbers.
The first step is to shimmy your way up vertically between the two large faces on either side until you can stand on that white boulder jammed in the middle. That is Nate on the boulder. I think the best is to have your back against one wall and use your legs against the other one to make your way up. Where safe, use your arms to elevate your back.
The next part of the Rabbit Hole is to continue inching your way up between the same two vertical faces, in much the same way. Here is Patti on a secondary spot to catch your breath before part three.
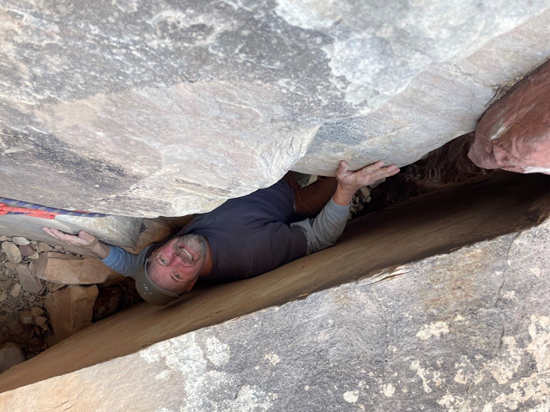
Part three is difficult to convey with pictures, but after wedging your way up further you come to a crack you must squeeze through. Here we all took our backpacks off to be able to be able to make the squeeze. My waste size is 34” and I was barely able to shove myself through. This is me looking down at Brett as he was about to take his turn.
The next section is a rather long steep section. The picture does not convey all of it. Although it’s quite steep, there was always somewhere to step or grab. That is our own rope you see Nate using for protection.
It is advisable to do this part one at a time, due to the danger of rock fall. Despite doing that, a golf ball size rock nearly hit me in the head descending this section.

Finally, it is the summit push. That is me in the red (I took four layers of clothing) going up. The picture was not manipulated, it really is that steep and exposed.

Finally, here is Nate, Patti and I at the top. Photo taken by Brett.
To get down, just retrace your steps. Remember, going down is more technically difficult than going up.
This was perhaps the most exposed and dangerous rock climb I have ever done. It was hours of heart-pounding adrenaline-filled fun! For now, I could stand to do some easier climbs, but I’m sure White Pinnacle will challenge me again. For one thing, I need to do an official 52 Peak Club climb to earn the King of Diamonds towards my goal of earning all 52 cards. Yes, I like external validation.
In closing, I would like to thank Brett for leading the hike and congratulate all three friends for the successful summit.