Wizard Recommends
-
 $11000 Welcome Bonus
 -
 $3000 Welcome Bonus
 -
 UP TO $777 BONUS
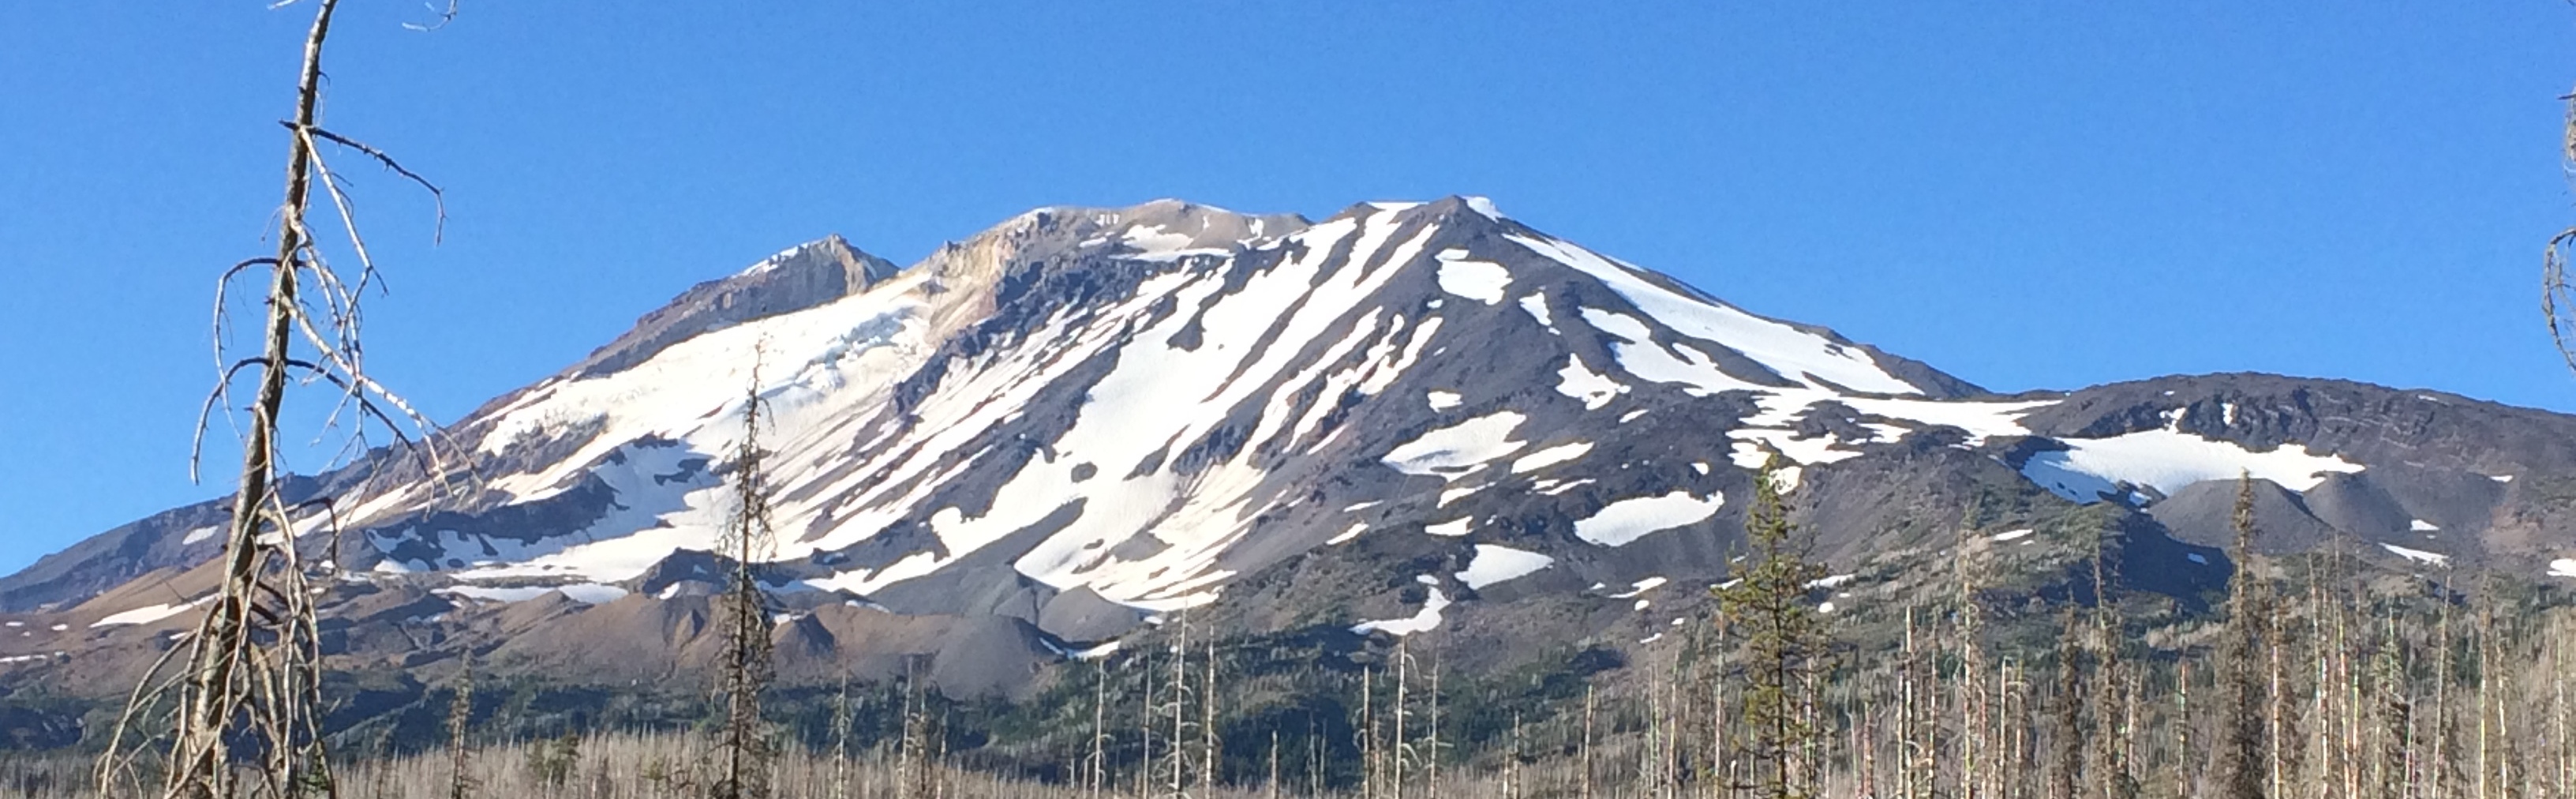
Mount Adams
Key Facts
- Total distance: 11.4 miles (round trip)
- Elevation gain: 6,680 feet
- Elevation at summit: 12,281 feet.
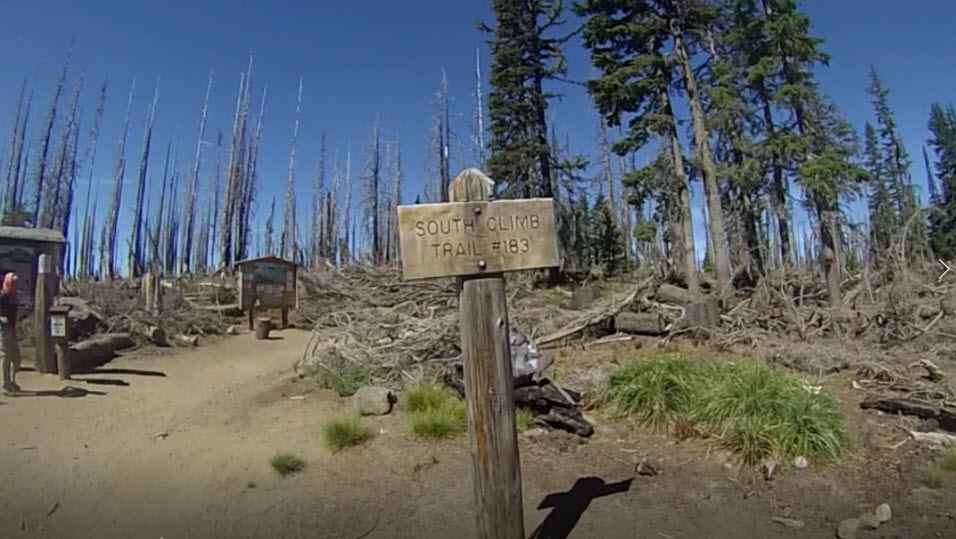
- Trail used: South Climb (#183)
- Prominence: 8,116 feet (37th in North America)
- Second highest peak in Washington
One of the items on my bucket list is to climb all the American Cascade Volcanoes that are high enough to be a challenge and safe enough for someone of my skill-set to do. Here is a status report as of this writing:
Wizard's Cascade Bucket Table
| Peak | Elevation | State | Status |
|---|---|---|---|
| Mount Rainier | 14,411 | Washington | Climbed |
| Mount Shasta | 14,162 | California | Climbed |
| Mount Adams | 12,280 | Washington | Climbed |
| Mount Hood | 11,239 | Oregon | Climbed |
| Mount Baker | 10,781 | Washington | Bucket list |
| Glacier Peak | 10,541 | Washington | Bucket list |
| Mount Jefferson | 10,497 | Oregon | Technical |
| Lassen Peak | 10,457 | California | Bucket list |
| South Sister | 10,358 | Oregon | Climbed |
| North Sister | 10,085 | Oregon | Technical |
| Middle Sister | 10,047 | Oregon | Technical |
| Mount McLoughlin | 9,495 | Oregon | Bucket list |
The three peaks listed as "technical" are described as class four, which most climbers use rope and all its accoutrements to safely ascend. I don't rule out attempting these summits one day, but I don't feel called to do them at this time and probably never will.
After experiencing an amazing total eclipse on August 21, 2017 in eastern Oregon, a friend and I set off to climb South Sister and Mount Adams, as long as we were that neck of the woods. South Sister we did successfully the next day. Two days later we made our way to Trout Lake, Washington, to begin our ascent of Mount Adams.
The first step was to obtain permits at the Trout Lake ranger station at a cost of $15 each. We were given plenty of advice on how to find the trailhead, trail conditions, rules, and so forth. The weather report was good and all systems were go. I must confess that after the long lecture we got I forgot the first thing I was supposed to do was to put our application in the box outside the door. Mistake #1.
The road to the South Climb trailhead is rough and a little difficult to follow at times. A few times at unmarked intersections, I wasn't sure which way to go. Fortunately, I guessed correctly for the most part and found the trailhead without too much difficulty. When in doubt -- drive in the direction of the mountain. The vehicle we used was a small SUV so we made it just fine. At the trailhead were some cars that get better gas mileage, like a Toyota Corolla and Prius, that made it too. My advice is that a high-clearance vehicle would certainly be preferable but any car you don't mind taking a little beating will probably do.
The trail begins in a burned out forest and stays that way for a few miles. Although this part of the hike was a rather boring slog, we were rewarded with excellent views of Mount Hood and later Mount Saint Helens as we gained elevation. Finally, we left the area ravaged by a past forest fire and saw living trees and fields of lupine (which I incorrectly refer to as lavender in my video of the climb).
About four hours into the climb we crossed paths with climbers on their way down. They said the previous day was quite windy but conditions higher up were looking good today. At our lower elevation we enjoyed a clear windless day.
This was the first ascent for either of us and we didn't see anybody climbing our direction within shouting distance the entire day. I knew we wanted to make camp at a place called Lunch Box Counter, but I wasn't quite sure where it was. When the trail left the tree line it became more or less a pile of volcanic rock. Wherever there was a flat spot, people had constructed wind shelters for tents. I suppose the lower ones were for people planning to do the climb in three days. It might be easy to mistake some of these camping areas as Lunch Box Counter. However, they aren't. Past a flat area with about a dozen campsites is a long, moderately steep ice field. It takes at least an hour to climb up this field to reach Lunch Box Counter, which is spread out over a large area on rock islands in the middle of the ice field. Where we made camp was on the lower end of the Lunch Box area and we had a large rock island, with many campsites, all to ourselves.
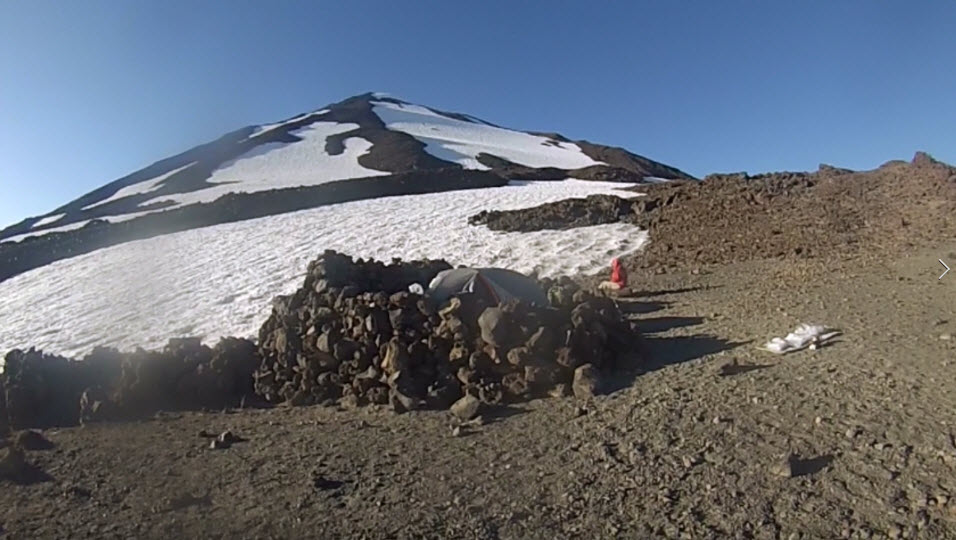
Our camp at Lunch Box Counter
We finished setting up camp late in the afternoon, so we had plenty of time to kill. It was my intention to melt snow with a Jetboil stove, for which I had a partially used can of gas and a full one. We gathered up snow in plastic freezer bags and empty water bottles and then I set about melting the snow. Somehow, I thought, and I'm not sure why, you were supposed to turn the valve the whole way when it's on. Mistake #2. To make a long story short, I exhausted one and a half cans of gas and produced only about four liters of water, which would have to be enough to last us both the rest of the climb. As a precaution, we set out freezer bags full of snow in the sunshine. I would later learn one can buy large plastic containers specially made for this purpose, which would have served this occasion perfectly.
That evening, I did a half-assed job of organizing my pack for our summit bid the next day. During this preparation, I realized I forgot to bring the headband for mounting my GoPro on my head. I wanted to capture the glissade on the way down on video. It turns out I left it in the car. Mistake #3.
After a quiet evening, we awoke naturally around 6:00 AM. I was the first to exit the tent and noticed the water bags we set out the previous evening scattered all over the place. When I picked one up, water poured out of puncture holes obviously made by a small animal (I suspect a marmot, despite never having seen one outside of the Sierras). At this point, I feared the worst for my food supply that I foolishly left in my pack the night before. I didn't even secure it well within the pack within a zippered compartment, which I could have done. Most of the food was just lying at the bottom of the pack beneath my layers of clothing. Fortunately, whatever animal has an affinity for bags of water left my food alone. However, I will count the fact that it wasn't eaten an act of luck, or something higher, as mistake #4.
After putting on many layers of clothing and affixing crampons to our boots, we made our way up. First we had get through a maze of snowfields and lava fields to get to the base of the Suksdorf Glacier, which was simply a big wall of ice. While many routes could have been taken, they all led to the same place, which was easy to see since it's the base of the ice wall before Pikers Peak. Said wall of ice is definitely steep enough to necessitate crampons and ice axe but not enough to need to be on a rope team. While the distance of this section was probably only about a mile, it was the most exhausting part of the climb. A great challenge. Certainly a major part of what makes Mount Adams a very popular climb. Fortunately, we still enjoyed great weather -- clear and nearly no wind. I quickly peeled off about half my layers of clothing as I warmed up climbing the ice.
Eventually, we made our way to Pikers Peak, which is a false summit we had been looking at ever since arriving at Lunch Counter. I've heard it is called that because if you think that is the peak, then you're a piker. At Pikers Peak it suddenly got a bit windy and cold, so I added some of my layers back on. We and the other climbers going up that morning discussed the need to bring crampons and ice axes the rest of the way, which looked comparatively flat and easy to the wall of ice we just ascended. I opted to leave them there, which, gratefully, was not mistake #5.
Pikers Peak
As we set off across a rather flat ice field, the wind died down and I got hot again so back off half my layers went again. After this flat ice field we reached a steep face of small pieces of volcanic rock where several switchbacks had been made by previous hikers. After that it was pretty much as easy stroll along a ridge to the summit.
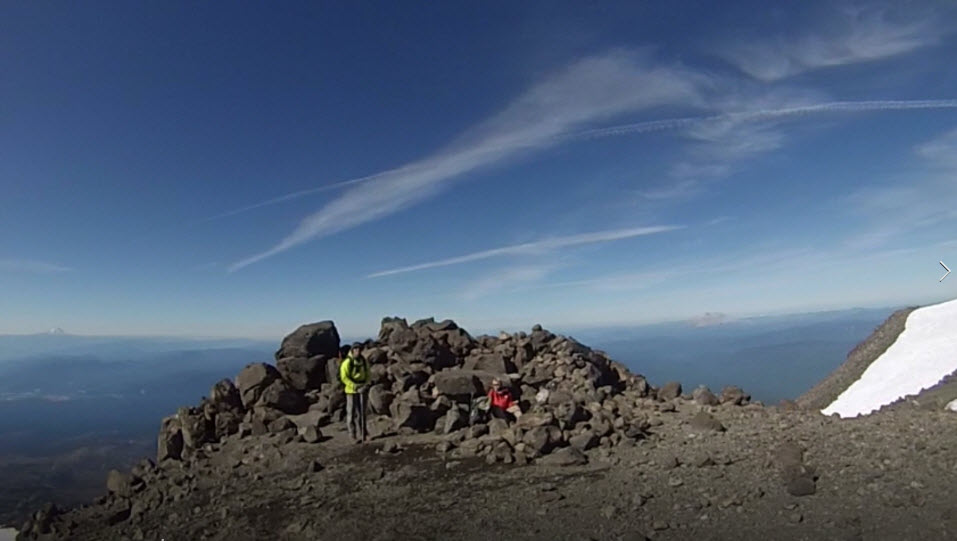
The views from the summit were magnificent. As soon as we reached the summit, we were rewarded with a clear view of Mount Rainier to the north, which I hadn't seen since summiting it two years before. To the west was Mount Saint Helens. To the south were Mount Hood and Mount Jefferson, and I could barely make out the Three Sisters. After the obligatory summit photos and video, we chatted with our fellow summiteers that Friday morning of August 25, 2017. That summit high feeling is always better when shared.

Summit photo with Mount Rainier in the background
The descent went fine. Back at Pikers Peak the big topic of conversation was the glissade back down to Lunch Box Counter. Issues were raised about the ice being hard and protruding rocks but we all knew that under the right conditions the Mount Adams glissade was legendary. After a few people decided to be the guinea pigs, we got ready to do it ourselves. This included removing the crampons and putting on as many layers of pants as possible. Despite having glissaded down a good portion of Mount Shasta six years earlier and my partner having glissading experience, neither of us could remember the proper way to hold the ice axe.
The first part was the steepest part. I will not lie that the ice was rather hard and quite steep, making for a glissade that was faster than what I would have preferred. Add to that was my GoPro dangling precariously from a short rope on my jacket zipper. Yes, this part was indeed dicey and I expended much energy trying to arrest myself from going so fast that I would be flung down the mountain uncontrollably. It did not help that I was holding the ice axe incorrectly, as I would later learn.
Half way down this stretch, I came to a crashing stop at a turn in the glissade path and realized my GoPro was missing. Despite being in the middle of a very steep and slick glissade path with no crampons, I was not about to easily lose my GoPro, after all the adventures we had been through. Carefully, I turned around and fortunately saw it about 20 feet up the path. I will call losing the GoPro due to not securing it properly as mistake #5.
The situation did not look unlike the steepest section I did two years about on Mount Hood called the Old Chute. Of course, then I had crampons on, was roped up for safety, and under the watch of experienced mountain guides. Here it was just me. My partner was already way down the mountain and probably wondering why I was taking so long.
As carefully as possible, I turned around and used my ice axe to advance up the glissade path inch by inch. Had it not been for doing essentially the same thing on Mount Hood, I probably would have been very freaked out. However, after all I had been through on Mounts Rainier, Hood, and Shasta, I wasn't going to not give it a try. It was also fortunate that my GoPro fell off only about 20 feet up the path as I could have been much higher. Reach it I did and put in a zippered pocket. Then I carefully turned back around and continued the glissade.
When I reached my partner I explained the delay and off we went. By this point, we were past the worst of it and the feeling of fear gave way to excitement. My partner went first and stopped to what look like chat with a couple climbers on their way up. It wasn't a chat but getting a lecture that was repeated to me on the proper way to hold an ice axe in a glissade. Both of us incorrectly held the entire axe to our right (we're both right handed) and used the pick against the edge of the glissade path as a brake. Mistake #6 -- and the biggest.
The proper way to hold an ice axe when glissading is across your body with the spike on the right side (if you're right handed) and shove the spike against the ice according to how fast you want to go. That made it much easier to control my speed and with much less effort. Where were these good Samartans higher up? At least we passed some of the climbers going uphill holding the ice axe properly. I'm sure several others who we crossed paths with before our lecture thought to themselves, "Those idiots are holding their ice axes wrong."
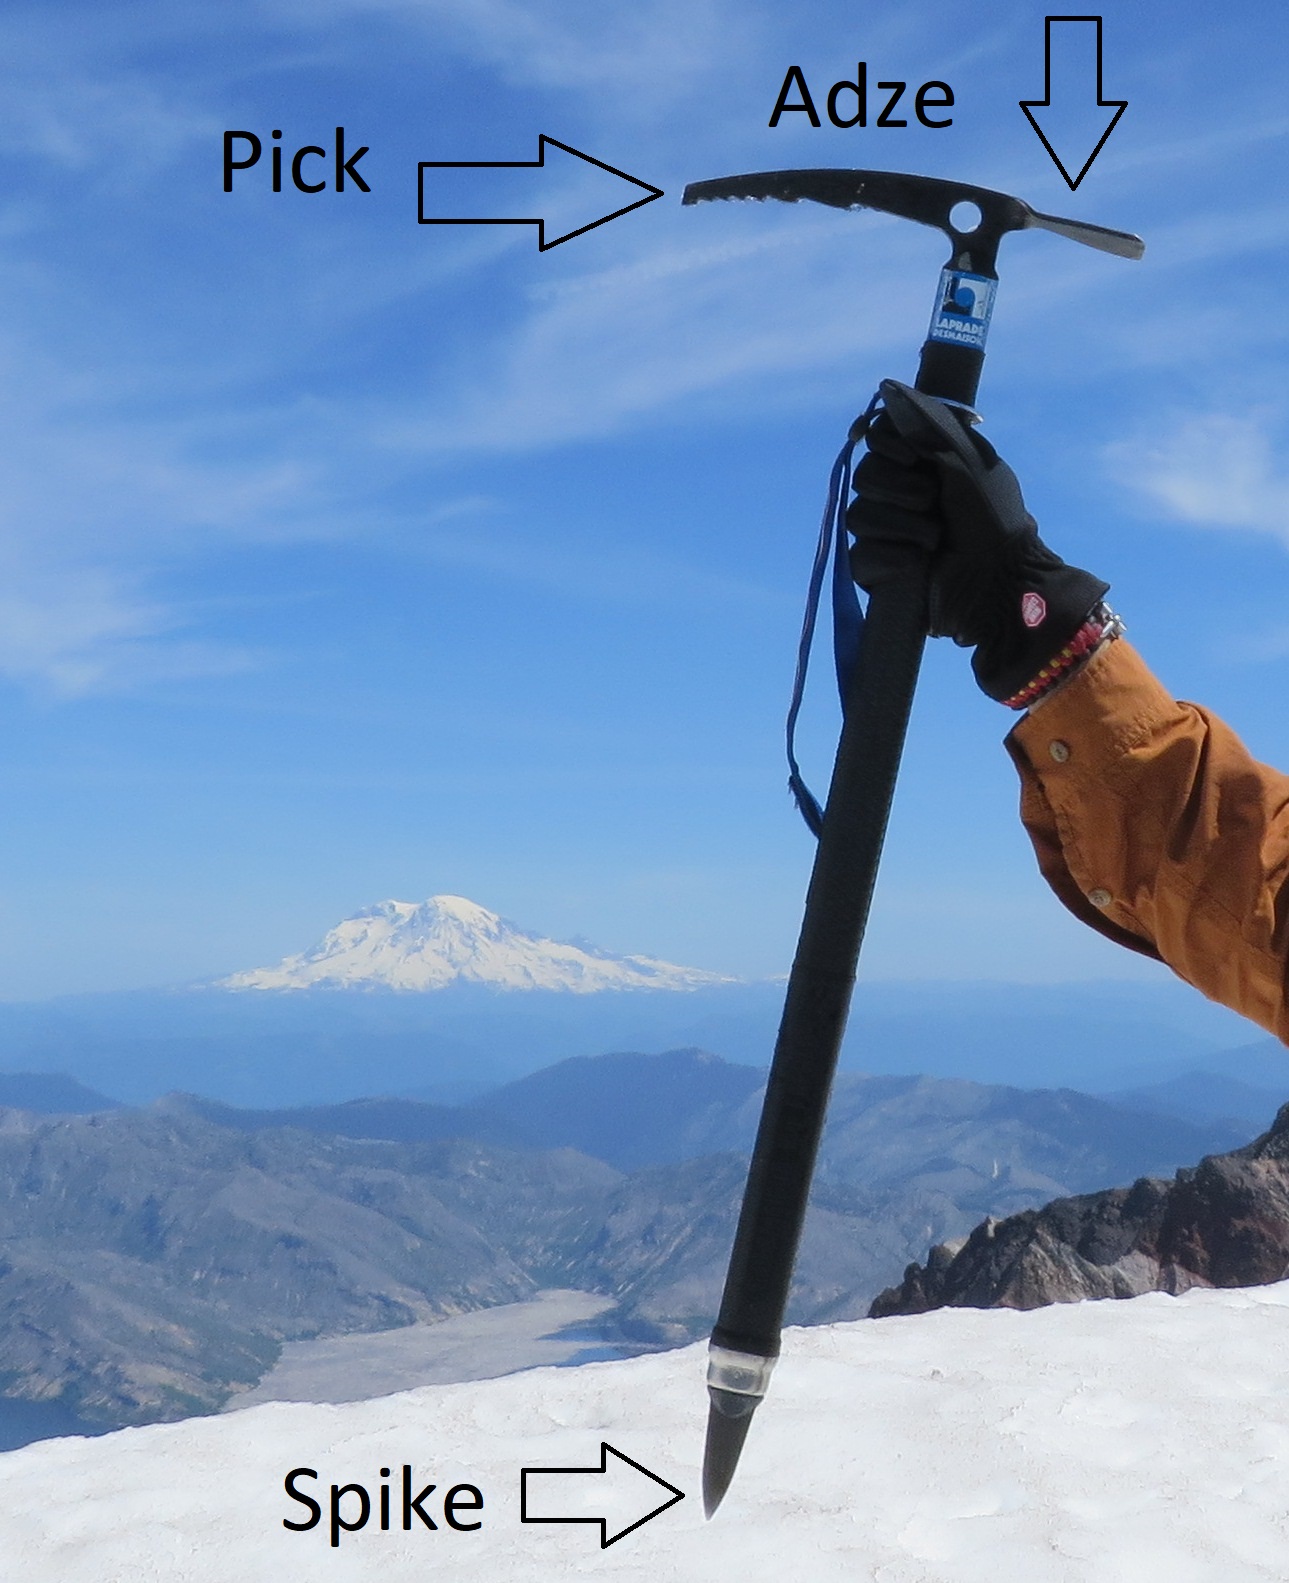
Parts of an ice axe
We made it back to our camp safely and packed up to resume the rest of the descent. I managed to do a somewhat assisted glissade part of the way after that, meaning I had to use my feet to gain enough speed to slide. Once back on dry land, the descent went fine. We passed many hikers that Friday afternoon on their way up. Despite running out of fuel earlier, we had enough water to descend and even dumped some of it to lighten our packs.
Before concluding, I'd like to say a word about the pros and cons of day-hiking Mount Adams and taking two days. At only 11.4 miles, many are evidently tempted to make a day hike out of it. Such an attempt should begin around midnight. I heard stories on the way down of people who had previously attempted this and got lost in the dark. This, I could easily see happening, going over the section that is mostly a pile of volcanic rocks. Even I lost the trail temporarily in that portion of the route in broad daylight. The burned-out forest I could also imagine getting lost in at night. Even without the issue of getting lost, I would still recommend taking a couple days. It is simply a much more enjoyable.
I had hoped to give you a link to my glissade at this point. While I did get some footage before my GoPro left me, it was simply awful, with the camera bouncing all over the place. However, I did get footage of the climb up and summit, which I posted on YouTube for you to enjoy: https://www.youtube.com/watch?v=gqbwF14K9WM&t=62s. My apologies for the lousy audio.
I truly hope to return to Mount Adams for a second climb soon. It was one of the most enjoyable climbs I have ever done. When I do, I promise to take a proper video of the glissade down, if conditions safely permit it.