


How to Create MP3 files from a CD
Recently I purchased an MP3 player. Before I go further, let me say that I came of age when the Sony Walkman (for the young folks, this was a portable cassette tape player that was the pinnacle of cool and convenience in the late 70’s). In fact, I think I still have mine in a box in the garage somewhere, not to mention hundreds of tapes.
However, it was time to get with it and it would seem MP3 files are the way to store music these days. I went to Best Buy, not sure what to look for. Based on the advice of a salesman under the age of 25, I left with a SanDisk “Clip Sport Plus Player.” He explained that to get music into the MP3 player I just had to connect it to my computer with a USB cable, which was true.
The next step was to procure some MP3 files. At the time, I didn’t own a single one. However, I’m a Patreon supporter of Gamazda, which entitles me to MP3 files of all her music. I surprised myself at how easily I downloaded her files to my computer and from there the MP3 player.
I was happy with that for a little while, but I eventually wanted more than just piano music. How to get more MP3 files? I already had a lot of iTunes music, but it was in a m4a format, whatever that is. I asked some younger people how to procure MP3 files and the two more common responses were Spotify and Amazon.
It would seem, after some research, that with Spotify you don’t actually get an MP3 file you can play on outside devices. It appears it’s a self-contained universe in that you must you their own service to play their music. With Amazon, you can indeed buy MP3 files, but it would seem you usually have to buy a whole album at a time. For example, Amazona charges $23.99 for U2’s Joshua Tree album via MP3 files.
However, searching for other options lead me to some saying it was possible to convert CD’s to MP3 files. Some sources on said subject required you to install their own app, but it is easy to do on a Windows computer without downloading anything. Here is how to do it.
Step 1 – Open Windows Media Player. On my computer it’s called “Windows Media Player Legacy.”

Step 2 – Put a CD into your CD/DVD drive.
At this point you should see a listing of every track on the CD.
Step 3 – Check those tracks who want to “rip.” At this point, you may also adjust the audio quality under Rip Settings → Audio Quality. A video I link to below says 192 Kbps is good enough for MP3 players.
When I did this, the format for the file defaulted to MP3. However, there are other options under Rip Settings → More options → Rip music → Format. You can also change the location where the files are created in this same screen.
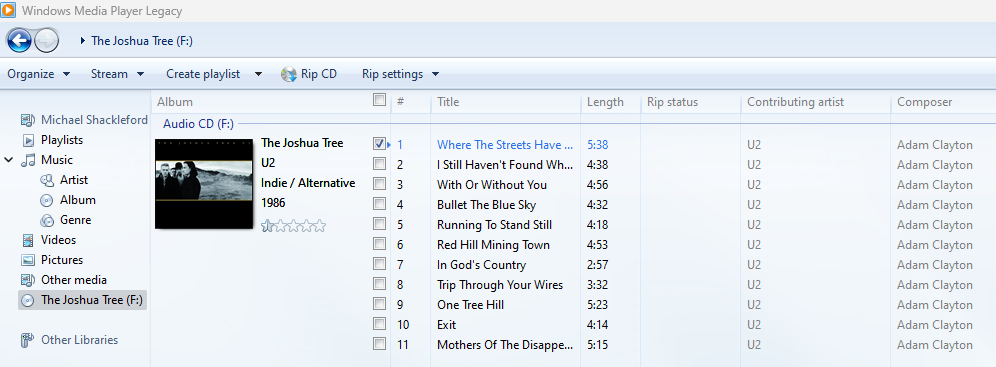
In the example above, I selected only ‘Where the Streets Have no Name’ from The Joshua Tree. Probably one of my top 40 songs of all time, but after 40 years I still haven’t figured out it’s meaning.
Then click “Rip CD.” Wait about 30 seconds per track and then the MP3 version will be conveniently in whatever location you indicated under settings, or whatever the default is if you didn’t change it.
It is nice when there is an easy way to do something in terms of technology for a change.
In closing, I would like to thanks Mister How To and his YouTube video ‘How To RIP Audio CD's with Windows Media Player (QUICK & EASY)’.
Until next week, may the odds be ever in your favor.